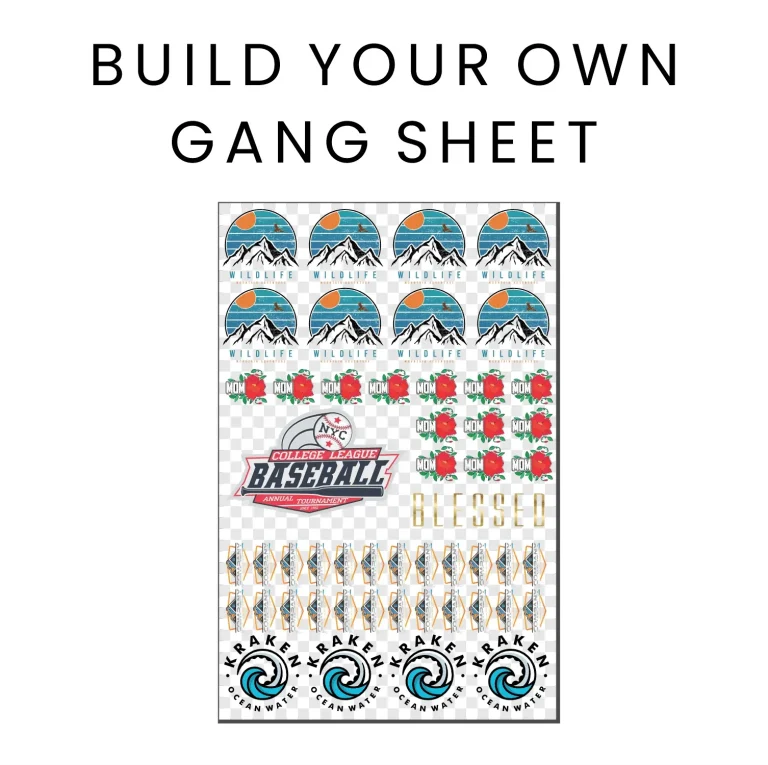
DTF gangsheet builder is the practical starting point for anyone stepping into direct-to-film printing, streamlining how you predesign, grid, and print multiple graphics on a single transfer sheet. By consolidating designs in one run, it helps beginners minimize waste and speed up production, a core idea you’ll see echoed in DTF printing for beginners. This approach aligns with a gangsheet printing guide mindset, guiding you through layout, color management, and workflow so every print looks professional without unnecessary trial and error. With DTF transfer sheets and a thoughtful setup, the builder reduces setup time between designs and improves batch consistency. Whether you are a newcomer or returning to a busy shop, following DTF workflow tips within a solid framework helps you achieve repeatable results and greater efficiency.
Think of it as a multi-design layout tool for transfer media that clusters several designs on one sheet to boost throughput. Seen through an LSI lens, this planning approach emphasizes space optimization, margins, and color consistency rather than working one design at a time. If you’re preparing for DTF printer setup and reliable production, this method supports robust workflow and consistent transfer results across batches. As you grow, you’ll find these terms align with DTF printing for beginners and the gangsheet printing guide, providing a cohesive framework for your learning path.
DTF Gangsheet Builder: A Beginner’s Path to Efficient DTF Printing
The DTF gangsheet builder is a practical blueprint for consolidating multiple designs on one transfer sheet, cutting down heat presses and material waste. For beginners, this approach helps you visualize layout, spacing, and color alignment across designs, leading to more consistent results and quicker production cycles. By focusing on a single, well-planned sheet, you’ll gain confidence in the DTF printing process and start building a reliable workflow. This aligns with the principles of DTF printing for beginners and sets the stage for practical DTF workflow tips.
To get started, map out your designs in a clean grid and set clear margins. Choose a grid size that matches your transfer sheets (for example, 4×5) and plan bleed areas to avoid edge-to-edge white gaps after transfer. Include a small test block on every gangsheet to verify color fidelity and alignment—a simple, repeatable check that mirrors the best practices in gangsheet printing guides.
As you design, think about how the DTF transfer sheets will perform across different garments or colors. This mindset reinforces a steady DTF workflow and helps you anticipate color management challenges early in the process, turning the gangsheet into a scalable system rather than a one-off experiment.
Master the Gangsheet Printing Guide: From DTF Transfer Sheets to a Smooth DTF Printer Setup
This subheading walks you through the end-to-end gangsheet printing guide—from file prep to pressing—so you can approach each project with confidence. Understanding how to coordinate DTF transfer sheets with a grid-based layout, margins, and safe zones is central to achieving consistent results across batches. By framing your process in terms of the gangsheet printing guide, you’ll reduce guesswork and align your work with the fundamentals of DTF printing for beginners.
A critical pillar of success is a reliable DTF printer setup. Start with nozzle health checks, calibration for color accuracy, and lightweight test prints to confirm that colors reproduce correctly on the transfer medium. As you finalize your layout, export a print-ready file, prepare the media correctly, and follow the step-by-step workflow to print the gangsheet, cure the transfer, and press with consistent temperature and pressure.
To maintain quality over time, integrate practical DTF workflow tips into your routine: plan small tests first, document settings for future runs, and practice color management to minimize drift. Regular maintenance of your DTF transfer sheets inventory and a clear file organization system will make the gangsheet printing guide a repeatable, scalable approach rather than a one-off effort.
Frequently Asked Questions
What is a DTF gangsheet builder and why is it valuable for DTF printing for beginners?
A DTF gangsheet builder is a planning approach that arranges multiple designs on a single DTF transfer sheet to maximize efficiency. It standardizes layout, margins, and color placement, reducing heat presses, material waste, and misprints. Why it matters for beginners: it aligns with DTF printing for beginners concepts, complements DTF transfer sheets, and fits with a solid DTF printer setup. Quick-start: plan your designs, choose a grid (e.g., 4×5), set bleed and margins, add a small test block on the gangsheet, export a print-ready file, then print and transfer. This workflow follows practical DTF workflow tips and a gangsheet printing guide to build consistency.
How do you start using a DTF gangsheet builder according to a gangsheet printing guide to ensure reliable transfers?
Use the DTF gangsheet builder in a repeatable, beginner-friendly process: – Calibrate your DTF printer setup and verify color accuracy; – Select appropriate DTF transfer sheets and adhesives; – Create a master layout with a grid and margins; – Include a test block on every gangsheet to verify color and alignment; – Export a print-ready file in high resolution with the correct color profile; – Run a test print, then the full batch; – Apply transfer film or powder, cure as directed, and press with consistent temperature and pressure; – Perform basic QC checks and document results. Following these DTF workflow tips helps you stay aligned with a robust gangsheet printing guide and supports DTF printing for beginners.
| Key Topic | Key Points | Why It Matters | Practical Tips |
|---|---|---|---|
| What is a DTF gangsheet | Grid-based layout on a single DTF transfer sheet; stacks multiple designs for one run; reduces heat-press cycles and helps color/placement management. | Increases throughput, reduces waste, and makes it easier to compare colors across designs on the same media batch. | Plan a simple grid first; start with a small set of designs to learn spacing. |
| Value of gangsheet beyond saving paper | Standardizes spacing/placement, lowers setup time between designs, and improves consistency across batches. | Leads to smoother operations and more predictable results across production runs. | Use alignment marks and consistent margins to maintain uniformity. |
| Core setup / Getting started | D TF printer, transfer sheets, heat press, powders/adhesives, and software to lay out designs in a grid; export a print-ready file. | Foundational tools enable a workable gangsheet workflow and reliable output. | Ensure software supports grid layouts and that you can export a proper print-ready file. |
| DTF printer setup | Calibrate for color accuracy and alignment; check nozzle health; perform head-cleaning; run test prints. | Reliable color/placement and a solid baseline for building gangsheet workflows. | Do regular test prints and maintenance; keep a color-proof routine. |
| Designing your gangsheet: plan, grid, and margins | Plan print area, bleed, and exact transfer-sheet dimensions; measure each artwork’s bounding box; choose a grid layout and margins to avoid edge bleed. | Ensures clean separation and repeatable results across designs and batches. | Include a small test block on every gangsheet to verify color accuracy and alignment. |
| Step-by-step workflow for a basic gangsheet print | Plan designs → create master layout → add bleed/safe zones → export print-ready file → prepare media → print gangsheet → apply transfer/cure → press and finish. | A clear, repeatable process reduces errors and speeds production. | Run a test print first; maintain consistent temperatures, pressures, and color settings. |
| Common pitfalls and how to avoid | Misalignment, color drift, bleed issues, inconsistent press results, and adhesive/powder problems. | These issues degrade quality and throughput without a proper workflow. | Calibrate, use ICC profiles, test swatches, apply controlled bleed, and ensure even heat/pressure. |
| Practical design and layout tips | Plan for garment variations, use grid snapping, manage color early, and keep clear file naming/version history. | Prevents misplacements and keeps projects organized as they scale. | Name files clearly (e.g., collections_2025_summer_gangsheet_v1) and maintain version history. |
| Maintenance and workflow optimization | Regular printer maintenance, inventory management, file organization, and documented settings. | Stability, reproducibility, and reduced downtime in production. | Establish routines for maintenance, labeling, and setting documentation. |
| Quality control and continuous improvement | Create a simple QC checklist: layout verification, color proof, print inspection, transfer surface cleanliness, and press results. | Ensures consistent quality and customer satisfaction across batches. | Integrate QC into every run and document findings for improvements. |
| DTF workflow tips for beginners | Start small, document progress, learn color management basics, and practice steadily. | Speeds learning, reduces waste, and builds confidence for larger batches. | Keep notes on settings, sheet types, and design approaches to reproduce success. |